It's a fairly simple costume. Unless you're me. Then it's insanely complicated and you're going to spend months and months of your life putting it together and obsessing over details that no one else will ever recognize or care about but you.
I wanted it to be as perfect as possible because I adore Aro and think Michael Sheen is a brilliant, beautiful human being whose work in Twilight is so completely delightful that I didn't feel it was worth doing without a completely full tilt effort on my part.
I love Aro because he is a person who has the most legitimate reasons in the world to be depressed, angry and spiteful but instead he is joyful (at least externally). He commands a large coven which includes the two most powerful vampires in the world and among the thousands of lives he's seen he has experienced nearly every single aspect of human life for three millennia--every type of way in which people create, learn, hurt, love, hate--much of which he is unable to ever experience himself no longer being human. He's watched the world change in a way no one ever has and he could easily be a dark cliche of a villain but he is not.
That's why I chose Aro and a less wordy version of that is how I would have introduced my costume during the costume contest last weekend if I weren't such a dork in front of people (and had slept more than three hours the night before).
To the costume!
Step One: Study Pictures of Michael Sheen from New Moon.
(This one was very taxing as you can imagine.)
Aro in New Moon is a combination of five basic things:

(The crest is made by the makers of all fine movie-related nerd products: NECA and they're fairly pricey now if you can find one at all. It looks just like the ones they wear in the movies, though, and they don't feel flimsy. They have nice weight.)

I accepted right away that I would never be as dreamy as Michael Sheen in a suit because no one is or ever will be.
So I moved on to the rest.
Step Two: Acquiring the Suit
I'm sure this would have been a much easier task had I not been a 32 year old female with wide hips and also with shoulders around the same size and shape of a 10 year old boy.
Eventually, after most of a day of searching through many stores with my very patient husband, I found one in the Boys' section at a department store. Trying these on was interesting, by the way. Luckily the dressing rooms were shared between sections in most places so no one necessarily knew what I was doing.
On top of just finding a suit, I had to find one that hid the fact that I am a girl as well as can be expected and that had the exact right details.
There should be three visible pockets (one is a breast pocket with nothing in it, the other two are side pockets with a visible flap).
There are only two buttons on the jacket and the bottom one is always undone revealing a black belt with a square silver buckle.
The lapels are fairly standard.
The shirt was a problem mostly because the sleeves were too big on everything and it also had to look a certain way because of the front around the buttons which are prominent as he does not wear a tie and they are directly behind the crest (and below your face) so it can't look too distracting. His is flat with no details.

(Although the stitching shouldn't be there either on the top one it was just the best approximation I found and not noticeable unless you're right on top of it . . . and you're somehow also freaky enough to know it's inaccurate.)
Lastly, I had to put something under all of this to further the illusion that I was male. Any ladies familiar with gender-swapping are aware of the many perils and difficulties of "binding" (artificially flattening your chest) which is most commonly done with ace bandages as far as I am aware. I have a few friends in the Trans* community who introduced me to readymade binders and I later found this awesome tank top from Korea with a hidden, adjustable elastic binder built into it. I've always hated using bandages and didn't want to add bulk under my suit so I tried something new and I'm glad because it worked incredibly well and was comfortable enough that I completely forgot about it while in costume which has never, ever happened while wearing a binder before.
#crossplaywin
Step Three: The Wig
This was the most stressful part of the costume because his hair is my favorite part and it's so perfectly in place that it was well into nearly impossible to get even close with a synthetic wig in a reasonable price range. And that was problematic in this particular case because his hair is pulled back exposing the entire hairline and necessitating the use of a "lace" wig which can get very, very pricey.
If you're not familiar with lace front wigs, they're made to look like a natural hairline with individual strands tied onto very fine mesh around the front of the wig so you can see through it to your skin/wig cap giving it the illusion that the "hair" is actually growing out of your scalp.

This is the one I used (after some very stressful and not very skillful altering). More expensive ones have a gradient in the density of the hair toward the front so it looks more realistic because the sparsest section of hair on your head is from your ears forward. (I hadn't known this until I went to beauty school and then it freaked me out that literally everyone is two steps from being bald in that area. Except for this wig which has far too much.)

So if you have a cheap wig you will need to pull most of that hair out yourself to get it to look less "wiggy". The knots on this were the hair was attached to the mesh were tied way too tight and the strand clusters too large so pulling them without warping the mesh was difficult and I did not succeed very well.
Cutting close to the "root" and then gently pulling the knot loose with tweezers would have worked better but after trying that I recognized that I did not have 70,000 hours available to me unfortunately. The other way you can make it look more realistic is by bleaching out the knots so they "disappear" into your scalp but you can't do that with synthetic fibers, sadly, and I really wish I had gotten another wig because I learned all of this in the process and ran out of time to get anything else. I think I developed an ulcer stressing out over this thing and never got it quite right.
(And don't let Beyonce fool you, by the way, she's wearing this **** all over the place. Nobody has hair like that.)
After the problems I encountered with thinning the hairline by hand I eventually ended up simply having to trim the mesh itself to get a widow's peak which was part desperation and part laziness.

The other problem was facial hair as he has very prominent sideburns. From looking at promo pics of him out of costume I knew that they had used a partial lace front which stopped at the temple and left his real hair showing in front of his ears.

This was problematic for several reasons: one being that I do not, thank God, have thick, glorious facial hair and the other being that at the time I began this I hardly had any hair and it was also dyed neon pink. On to looking for facial hair in the same style as the lace fronts! They turned out to be bizarrely overpriced and not at all convincing. So I moved onto the next step which was making my own. It's done with the same mesh as the wigs and something called a "ventilating hook" which is an asshole-ishly minuscule device:

This was actually very fun to do, but I turned out not to be patient enough to do it right with no guarantee it would even work out correctly. I made a test one in which the hair was too dense and looks like a rectangle of Muppet hide:

Hah!
I also swapped out my lip rings hoping those studs shown there would interfere with the look less but after chipping my tooth and nearly ripping my lip off from accidentally catching the discs on the back with my teeth while chewing, I had to compromise or remove them altogether. Accidentally biting down on a piece of metal while eating is very painful, by the way. I'd rather have another c-section. At least that involves Morphine.
But luckily my hair grew back enough that I was able to flat iron, trim it, and use my own hair after all.

Yay!
Aaaand here's where I cut through my earlobe while attempting to do the above backwards in the mirror. Not so yay. Literal blood, sweat and tears involved here.

Somewhere in all of this I emailed Stacey Butterworth, the wigmaker from the films, who was very sweet when I explained my costume, offered to assist me and graciously did not call the cops on me for being a crazy person. I learned that Michael's wig cost around $7,000. I then felt slightly better about not being able to make my synthetic one look as nice knowing that the impossibly smooth look of the movie version cost more than my car.
Okay. Application. There are two ways to do this: one is using tape and one is using glue. YouTube scared me away from glue with videos of forehead cancer so I went with tape which I later regretted as it required me to put in on my face in the exact same shape as the ghetto hair line I had hacked out because there was no extra lace to hide the tape the way it's supposed to. They come with extra lace as pictured above so you can trim it to whatever length you like (you need to use pinking shears or the kind which make scalloped edges for scrapbooking as it makes the lace fade into your skin more smoothly than a sharp line will if the lace has a courser weave. The scalloped edges will also keeping it from fraying).
The necessity of having the tape be so precise was the most nightmarish thing in this entire process and took hours and multiple applications every time I tried it in Forks despite doing it at home in about twenty minutes. Swearing happened. It was ugly. And this is where the "tears" part came in when I tore some tape off without spraying it with adhesive loosening spray first. I'm lucky to still have skin on my temple. It's made to stick to skin and it does its job with abandon.

Also, use a scalp protectant under it!
Getting the widow's peak in the center was so ridiculously difficult because I don't have the same field of vision in both eyes due to having Strabismus (I can't see the stupid sailboat in those Magic Eye posters because my vision doesn't cross at a normal point, the 90s were a sad time) so I finally had to draw on my face with eyeliner to make sure I got it right:

If you're ever going to attempt this, be careful not to pull on the lace when you apply it or you'll end up with that weird ripple effect you can see on the right side there. But even professionals get this wrong as I've seen it on celebrities now that I know what it is.
Again, Beyonce isn't perfect either:

The wig part is longer than I expected and it is not over because that was just getting it on, styling it was another matter entirely.
There are several problems with styling synthetic wigs: one is that plastic strands are too smooth and slid apart easily and most regular hair products cannot be used without damaging the fibers.
This wouldn't have been so much of an issue if his hair were simply pulled straight back. It's not. It's parted in at least three places (five in some shots) which are styled into place individually. It was like a Chinese Puzzle Box of a hairstyle and I never got it to do exactly what I wanted. It took me weeks to even figure out what was going on there. It looks simple enough but it is very much not especially while trying to hold multiple sections in place without them tangling or falling apart while you worked. It would probably be much simpler to do this on another person than on yourself.

A veeeeery messy first attempt parted on the wrong side because I don't know right from left:

Next year I'm getting one with a custom hairline because this doll hair look drives me nuts.
Okay. That's pretty much it for the wig except for when I had to trim it three times and kept having nightmares that I had cut it too short accidentally in the week leading up to SMD.
Step Four: Contacts
In the book the older members of the Volturi are described as having a "milky" cast to their eyes. This was toned down in the movies but if you look at the three leaders and Alec and Jane in the Volterra scene their eyes are an off-color red compared to the other human blood drinkers in the film.
I bought cheap ones at first from a disingenuous website which sent me this biz here:

I ordered a second pair in purple for a cosplay of an original character from a fic and they were also not what was pictured on the site. They ignored my multiple attempts to contact them about these. It's this site: http://www.brilliantcontacts.com/ so avoid them and the brand "EDIT" they are very uncomfortable and cheaply screen printed.
First real trial run with the cheap contacts and crap hairline
before I had started on the makeup phase:

A lot of people were looking for red contacts before SMD this year so I'm including a few links I found for where to get nice ones.
There is a website where they sell $300 prescription ones which look nice but if you're going to spend $300 on contacts there's no reason not to go to the source and get custom hand painted ones from the amazing woman who made the ones for the films.
Her name is Cristina Patterson and you can buy them through that site in the link (you will need to visit an eye doctor and have a proper contact lens fitting done).
$300 turned out to be too steep this year because of, you know, food and shelter reasons so I eventually got to Honey Color after a lot of searching around. This site sells what are known as "circle lenses" and they are larger than regular contacts. They make your irises larger and doll like. A good look for supernatural cosplay. They are however more complicated to insert because of their size so if you're not used to contacts at all these may be frustrating.

Better. Also: crazy eyes.
Step Five: Makeup!
After a lot of video watching and internet scouring I ended up with a pretty ghetto vampire makeup routine which involved using a Maybelline Cover Stick in White in a very thin layer over my entire face. Also a thing I used to pretty good effect was putting eyelid primer on your ears before applying anything to them to take the shine off and keep the white from look smeary or greasy since the skin on your ears it not as porous as your face.
On top I used MAC Blot Powder Pressed in Light which is what was used in Twilight on Edward and Bella. The Volturi were apparently airbrushed and that wasn't going to happen so I compromised while still getting to utilize my previous research and products during my prep for Bella.
Their skin is described as having an "onion skin" effect in the book for New Moon due to their extreme age and I didn't even try to go for that on the outset because they said it have been the result of airbrushing. I attempted to use Immortal Body Shimmer by Twilight Beauty for light sparkle but it pulled my foundation up and fell off quickly when it dried. (By the way, caution going to that website if you don't want to spend $400 on Twilight-themed makeup. The Volturi lip gloss is my favorite makeup item I've ever owned. That stuff is amazing.)
On the last day of my shopping before the trip I found a powder by NARS which did this cool thing which looks brighter in person but I'm not sure was very visible over the white foundation and powder because I couldn't see my own face in the sun so I don't know. It's pretty though. Onion skin-y:

Oh and if you have unevenly textured skin like I do (thank you, Utah air) someone recommended this at the last second as something her daughter uses under her foundation and it's seriously some kind of black magic. It completely smoothes out your face and feels sort of velvety. If you've ever mixed water and cornstarch it has a similar texture only smoother and transparent. I know it's made by Monistat but it's not intended for your hoo-ha so it's not as weird as people putting hemorrhoid cream on puffy eyelids which is an accepted practice apparently.
The last things were using Benefit Silky Finish Lipstick in Ms. Behavin'. Since I couldn't find what they used on the actual Volturi themselves I got what was used on Edward and Alice in Twilight because it was a really nice color and it gives me a Twihard-y thrill to use the same products from the movie. But unless you're being Alice, don't try to actually wear it, just put it on and let it sit for a second and then blot it off with a tissue.
When I got feedback on Facebook during test runs one of the problems was the white makeup looking too "flat" so I again doubled up on the use of Bella's makeup and used MAC eyeshadow from Twilight in Blanc Type to add some definition and Too Faced's Brow Envy Kit it make my eyebrows heavier.
I did some sewing on the shirt and pants for my suit (**** invisible stitching, **** in the ****) but that was a horrifying, Frankenstein mess under there so I'm going to not think about it or explain it. My suit looked slightly improved after so I don't suppose it matters.
It was a long process which started in April and ended only a few days before the event but it was a really enjoyable experience (except for the ear-cutting and the skin ripping) and learning opportunity for a newbie cosplayer. I'm sure I have some things wrong here and there are better, easier ways to do a lot of this but this is just what I did.
And now, although it is a very bad idea to put my silly ass face next to Michael's freaking adorable one:
Here is some . . .

. . . goofy smiling . . .

. . . side hair . . .
.jpg)
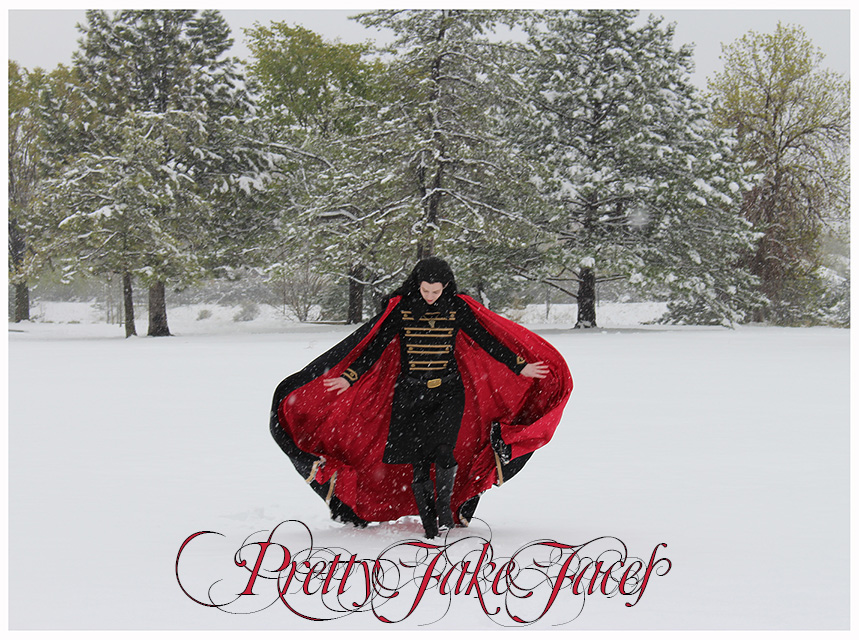
. . . and the end product of my not perfect but very loving tribute to my favorite vampire.
The End.
But maybe next year I'll buy a red tie . . .

Ugh, my Marcus cosplay will never be as good as your Aro cosplay. People are just going to think I'm a depressed part of the guard or something. -_-
ReplyDelete